


It is best to plan for every part of the rental process as a landlord, including move-outs. Most tenants and landlords have heard of the practice, but not everyone understands what a move-out checklist should include. Thus, we have compiled a comprehensive explanation of the process from notice to vacate to new move-in. Read along while we discuss why a tenant move-out checklist is essential and how it can help landlords protect their investments.
What is a Move-Out Inspection?
Landlords or property managers will generally complete a move-out inspection within 48 hours. An inspection serves as a comprehensive evaluation of a property’s condition once the tenant vacates. The findings will determine if any damage is beyond normal wear and tear compared to the move-in inspection.
An inspection is vital because damage determined as above normal wear and tear allows landlords to deduct from the security deposit. By law, landlords have a set period of time to return the deposit to the tenant. Landlords will want to check their local laws, but it typically is around 30 to 45 days after moving out. For efficiency and record-keeping, the best way to perform a move-out inspection is to use a checklist.
Why is a Move-Out Checklist Important?
Unfortunately, some tenants may disagree with or deny the damage found. These disputes can land both the tenant and landlord in mediation or court. As such, a move-out checklist is vital evidence in case a dispute arises over withheld security deposit funds.
What Should a Tenant Move-Out Checklist Include?
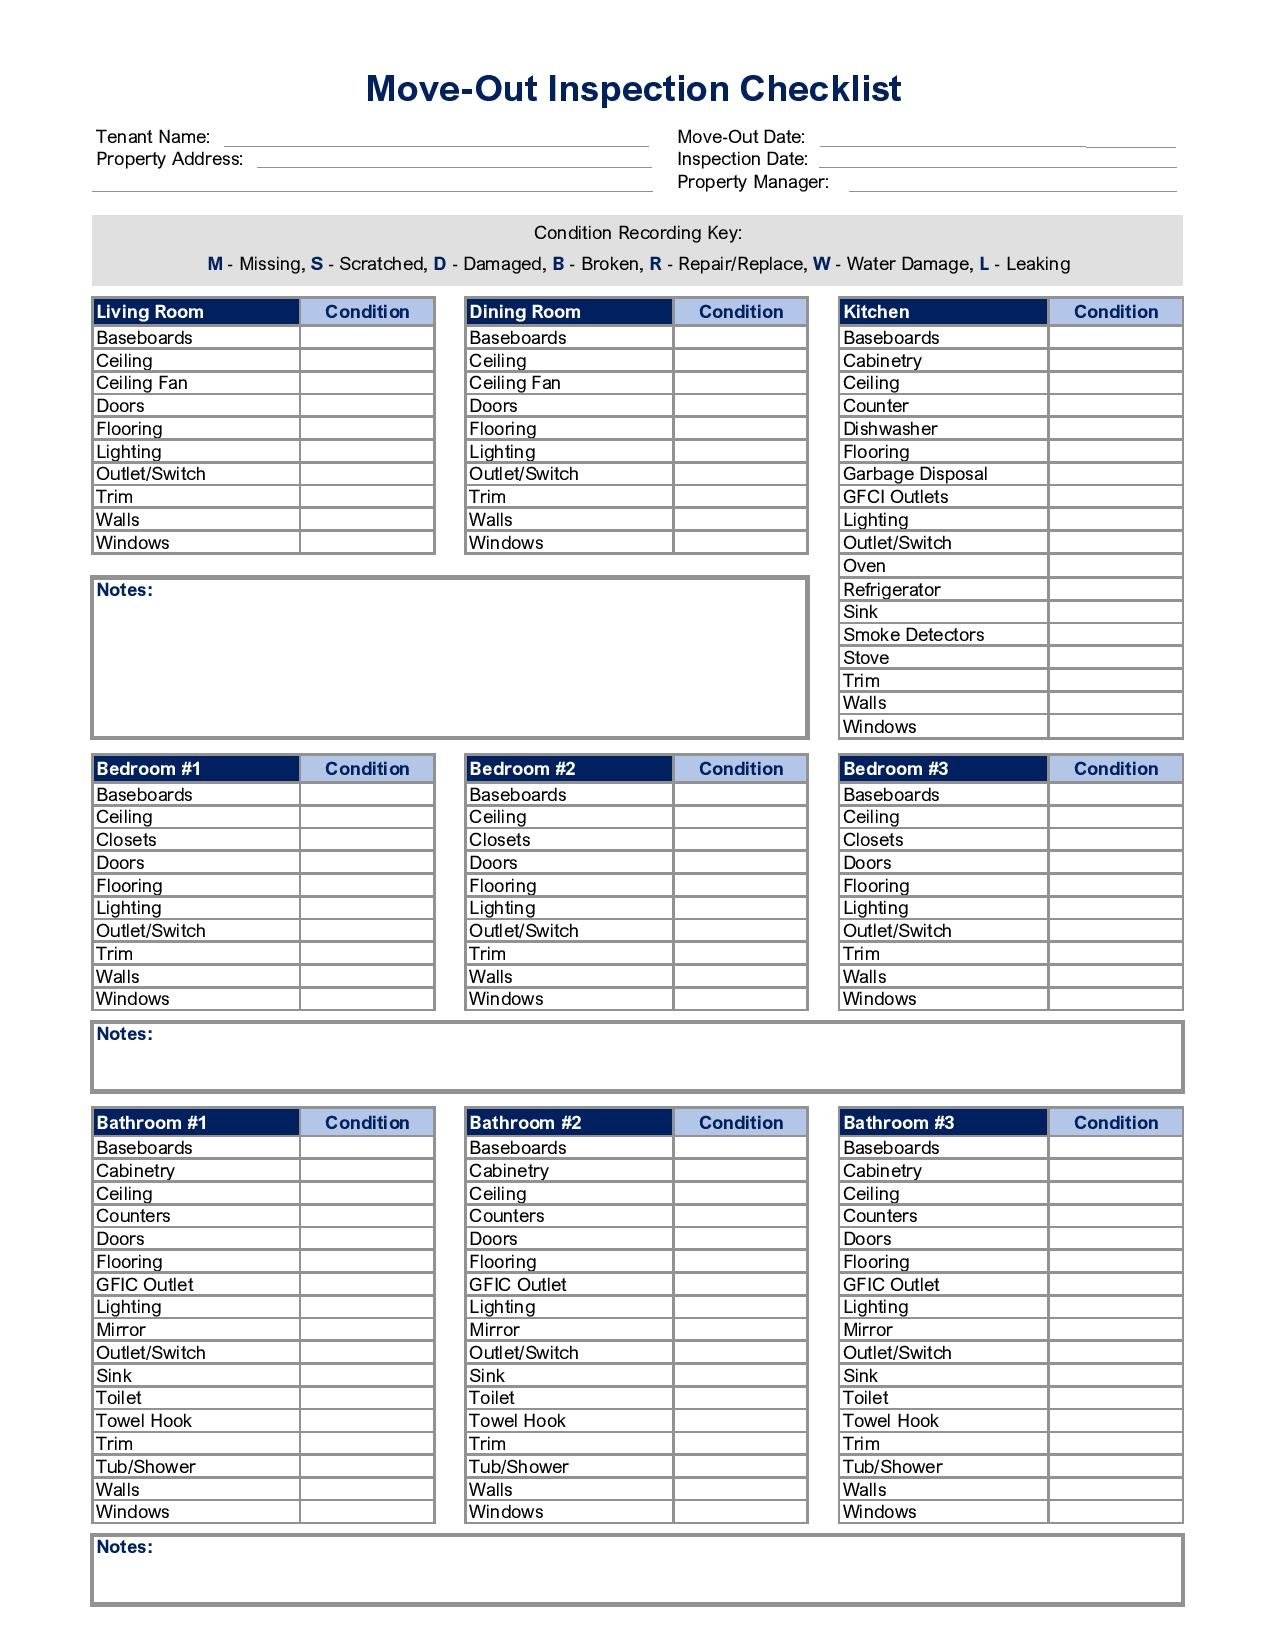
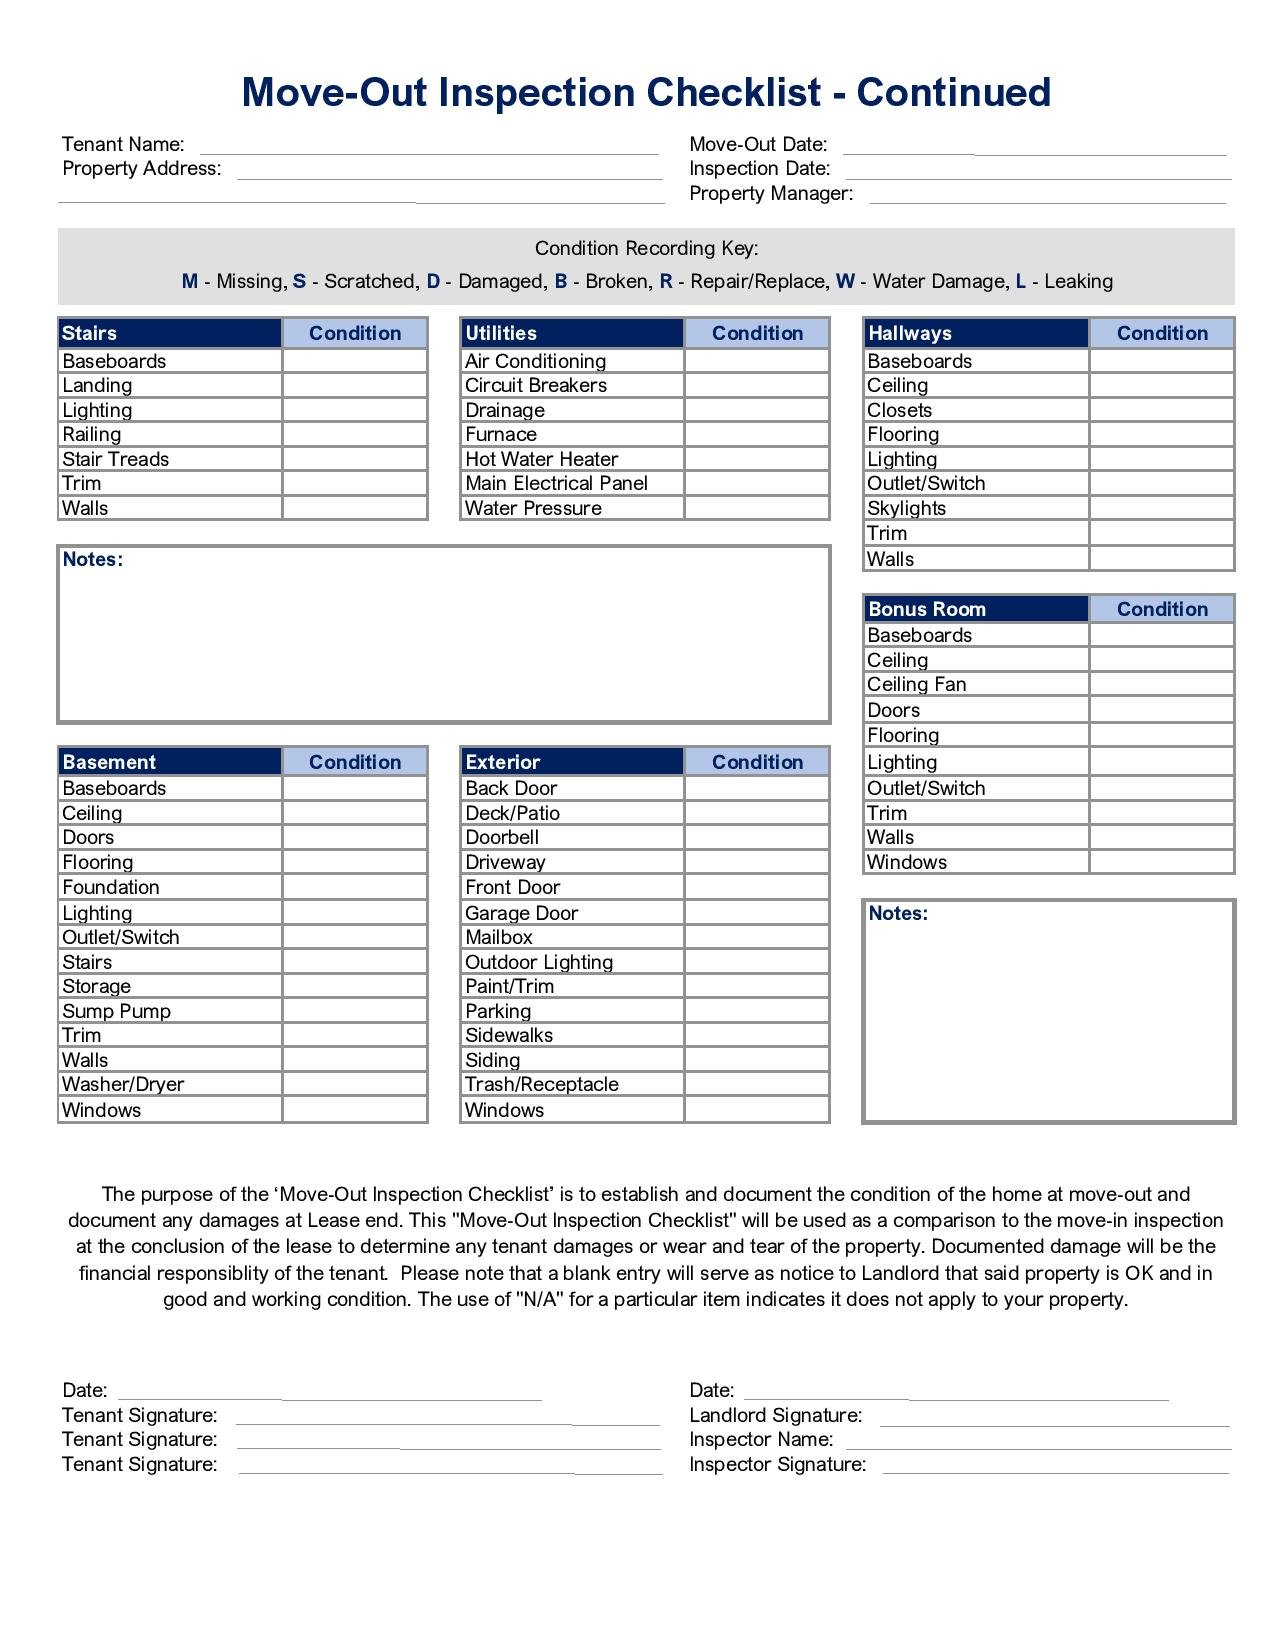
 A practical tenant move-out checklist is thorough, tailored to the property, and, most of all, organized. Creating a move-out checklist for your properties ensures a smooth and efficient process. The best way to begin is by breaking the property down room by room. To create a comprehensive tenant move-out checklist, include the following.
- Rental Property Address
- Tenant Contact Information and Forwarding Address
- A Field for the Move Out Date and Date of Inspection
- Individual Sections for the Items in Each Room of the Property
- Additional Blank Fields to Record Notes or Special Room Features
- Larger Space for Documenting Comments
- Places for Every Tenant and the Landlord to Sign
What is Tenant Damage vs. Wear and Tear?
A move-out inspection aims to determine the property’s overall condition. This process is to see what normal wear and tear versus damage the tenant may have caused. Normal wear and tear occur as the property fixtures and systems naturally age.
Since it’s not caused by neglect, landlords must address wear and tear at their expense. That said, extensive damage within the property results from the tenant’s abuse or neglect. In this case, the tenant is responsible for repairing or replacing damaged property. Some areas to pay close attention to include:
- Carpet
- Hardwood Flooring
- Tile Flooring
- Countertops
- Walls and Paint
Carpet
Hardwood Flooring
When hardwood or laminate flooring has normal wear, there are possibly some light scratches or fading from prolonged sunlight exposure. The tenant is responsible for the damage if the floors have deep scratches or damaged pieces.
Tile Flooring
Tile is a very durable material for use in rental properties. Any broken, missing, or chipped tiles are the tenant’s responsibility to fix. That said, dirty grout or scuff marks on tile are simply normal wear and tear.
Countertops
Depending on the countertop material, light scratching or watermarks result from normal use. However, damaged corners, chipping, burn marks, and more prominent stains are signs of tenant damage.
Walls and Paint
Rental properties experience more movement of furniture than average homes, and with that, walls suffer. Therefore, slight cracks from settling or scuff marks on the paint are expected. However, if walls have holes, large scuff marks, or are an unauthorized paint color, tenants are responsible for correcting the issues.
Common Mistakes to Avoid with Move-Out Inspections
Move-out checklists are a necessary and excellent tool for landlords, but only if used correctly. So, to ensure you do your part as a landlord, avoid these common mistakes.
- Clear Communication – One of landlords’ biggest mistakes is poor communication during the move-out process. Tenants are busy packing and moving, so be sure to schedule the inspection ahead of time so everyone is on the same page.
- Premature Promises – Never promise or discuss how much security deposit a tenant will receive before the inspection. Only a thorough examination will reveal damages that could jeopardize the deposit.
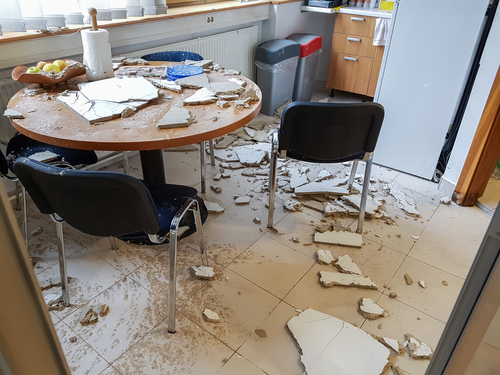
- Incomplete Information – Detail matters! As a landlord, ensure the inspection checklist is easily understood, and clear descriptions and photographs document everything. This protects you in the event of a disagreement on the condition.
- Inaccurate Charges – The tenant move-out checklist is a landlord’s proof of the home’s damage and the repairs needed. A failure to accurately or entirely log these charges could prove detrimental if there is a dispute. So, take care not to forget any items.
Sample Move-Out Checklist
You Received a Notice to Vacate, Now What?
When a notice to vacate is received, landlords must jump into action to secure a new tenant. However, move-out inspections are only a portion of the process. The entire process involves paperwork, scheduling repairs, marketing, showings, and more, all of which must be done promptly. To help guide you through the steps, work with your Northern Virginia property management company and check out the list below.

- Finalize the Move Out Date with the Current Tenant
- Evaluate the Local Competition and Begin Marketing
- Schedule and Complete the Move-Out Inspection Checklist
- Complete Turnover and Repairs
- Disburse Security Deposit to Former Tenants
- Test Smoke and Carbon Monoxide Detectors and Service HVAC System
- Determine the Move-In Date for New Tenants
- Sign the New Lease
- Collect the Security Deposit, First Month’s Rent, and Other Fees
- Provide New Tenants with a Welcome Packet
- Complete a Move-In Inspection Checklist with New Tenants
- Follow Up
Finalize the Move-Out Date with the Current Tenant
Once your tenant has expressed their intent to move, finalize the date and time they will vacate. This is invaluable information as it aids landlords in pre-scheduling turnover work and inspections. Also, having the move-out date allows you to set an availability date to begin marketing as soon as possible. Any steps a landlord can take to avoid extended vacancy are for the best.
Evaluate the Local Competition and Begin Marketing
Pre-leasing before the current tenants leave is a great way to limit vacancy time. Check out the local competition and adjust your desired rental rate to align with the area. It is good to begin marketing 30 to 45 days before the current tenants move out.
Just be sure to allow yourself enough time to complete the turnover. Depending on the time of year, overall condition, or how many properties you have, turnover may take as little as a few days up to a few weeks. Either way, ensure you do not set an availability date you cannot deliver on.
Schedule and Complete the Move-Out Checklist
Ideally, the current tenant and landlord complete the move-out inspection on a mutually agreed-upon time and date. This is your opportunity to document any suspected tenant damage and evaluate added repairs needed before the next move-in. Take your time and take photographic or video evidence to thoroughly capture the home’s condition. Not only does this determine what, if any, deposit is held, but it also helps avoid possible disputes.
Complete Turnover and Repairs
Complete any necessary repairs as determined by the inspection or local compliance laws. Standard turnover repairs include fixing the damage, completing renovations, a fresh coat of paint, changing HVAC filters, and re-keying the locks. It is also a good idea to hire a professional cleaning service if your budget allows. If a lead test is required, consider scheduling in advance to ensure services are available when you need them. Use only trusted vendors familiar with the quick turnaround rental properties rely on.
Disburse Security Deposit to Former Tenants
Once damages and repairs are determined, the remainder of the deposit can be returned. By law, landlords have a finite timeframe in which to do so, typically 45 days. If you opt to deduct, be prepared to provide itemized receipts documenting all charges.
Test Smoke and Carbon Monoxide Detectors and HVAC System
Most local jurisdictions require landlords to have working smoke and carbon monoxide detectors. In between each tenant, make sure all units are functioning properly. Equally important is servicing the HVAC system to ensure it operates efficiently and at its full potential. If any issues arise, address them immediately.
Determine the Move-In Date for New Tenants
As potential tenants apply and are approved, verify their desired move-in date falls in line with your projected availability date. Be sure to communicate any delays in completing repairs that may jeopardize tenants moving in on time. Always give yourself a little cushion when setting the initial availability date, just in case issues arise.
Sign the New Lease
This is one of the most important steps as a legally binding agreement. Take time to carefully review your tenant’s terms, clauses, rules, and addenda. This signifies all the details each party agrees to, so each side must understand their role and responsibility.
Collect the Security Deposit, First Month’s Rent, and Other Fees
Once the lease agreement is signed, collect all the necessary funds. All funds should clear before handing over the move-in keys, so money orders or cashiers’ checks are best. It is also a good idea to require the rent to be separate from any security deposits.
Some jurisdictions do not allow the commingling of funds. Therefore, deposits must be held in a different account. Check your local laws and landlord requirements before accepting commingled funds.
Provide New Tenants with a Welcome Packet
Making tenants feel at ease in their new home is a solid foundation for a great landlord-tenant relationship. So, provide them with all the critical information they need in one easy-to-read packet. Include a personalized welcome letter along with the essentials such as:
What to Include in a Welcome Packet?
- How to set up utilities
- Acceptable ways to pay rent
- How to report maintenance issues
- After hours emergency phone numbers or contact
- What to do if locked out
- Parking information
- Trash disposal and recycling schedule
- Owner or property manager contact information
- Community rules or expectations
- Neighborhood interests such as restaurants, nightlife, cultural attractions, or stores
Complete a Move-In Inspection Checklist with New Tenants
The move-in inspection is compared with the move-out inspection to determine damage. Therefore, each time a tenant moves in, complete a new move-in checklist and take either video or photographic evidence of the property. Make sure to complete this with the tenant so each party can sign off and receive a copy for their records.
Follow Up
To further enhance the landlord-tenant relationship, do not forget to follow up. Even with a welcome packet and the best intentions, questions still arise as tenants settle into their new place. As a landlord, reach out to tenants anywhere from 1 to 2 weeks after move-in. This simple gesture can go a long way in keeping your tenants satisfied with their decision.
Keep Your Investments Protected
Handling the day-to-day tasks of running a rental property business can be exhausting and overwhelming, especially for one person. Are you looking for a qualified property management expert to take away the stress?
Bay Property Management Group is the area’s leading full-service property management company. We offer management in Baltimore, Philadelphia, Northern Virginia, and Washington DC. Our in-house maintenance technicians perform inspections while providing owners with comprehensive estimates. Contact us today to learn more about the benefits of professional rental management services.