
 Cold weather is approaching fast, is your rental property prepared? If not, now is the time to think about putting winterizing procedures at the top of your list. The cold months of Winter can, unfortunately, bring unexpected repairs and problems. That said, by taking some simple precautions, many potentially costly emergencies are avoidable. So, continue reading below as we delve into what it means to winterize a rental and the steps necessary to get your investment property ready for the season.
What You Will Find in this Blog –
- What Does it Mean to Winterize a Rental Property?
- Steps to Winterize a Rental Property
- How Do You Know if Your Pipes Are Frozen?
- Will Insurance Cover Frozen or Burst Pipes?
- Protect Your Rental with Professional Management
What Does it Mean to Winterize a Rental Property?
Simply put, winterizing means preparing a property’s systems to handle the winter weather conditions. No landlord, property manager, or owner wants to get the call that a pipe has burst or the heater has gone up. Thus, preventing these issues and others starts with proper winterization. Proactive planning saves owners and property managers both time and money in the long run. With that in mind, let’s take a look at some steps to winterize your property.
Steps to Winterize a Rental Property
 Cold weather can strike quickly; therefore, follow along with these steps to winterize a rental property and ensure it is ready to take on Winter when the time comes.
- Prevent Frozen Pipes
- HVAC Systems
- Check Windows and Doors
- Remove Window AC Units
- Reverse Ceiling Fans
- Set the Temperature
- The Drip System
- Test Smoke Alarms
- Clean Chimneys
- Insulate Exposed Pipes
- Add Insulation
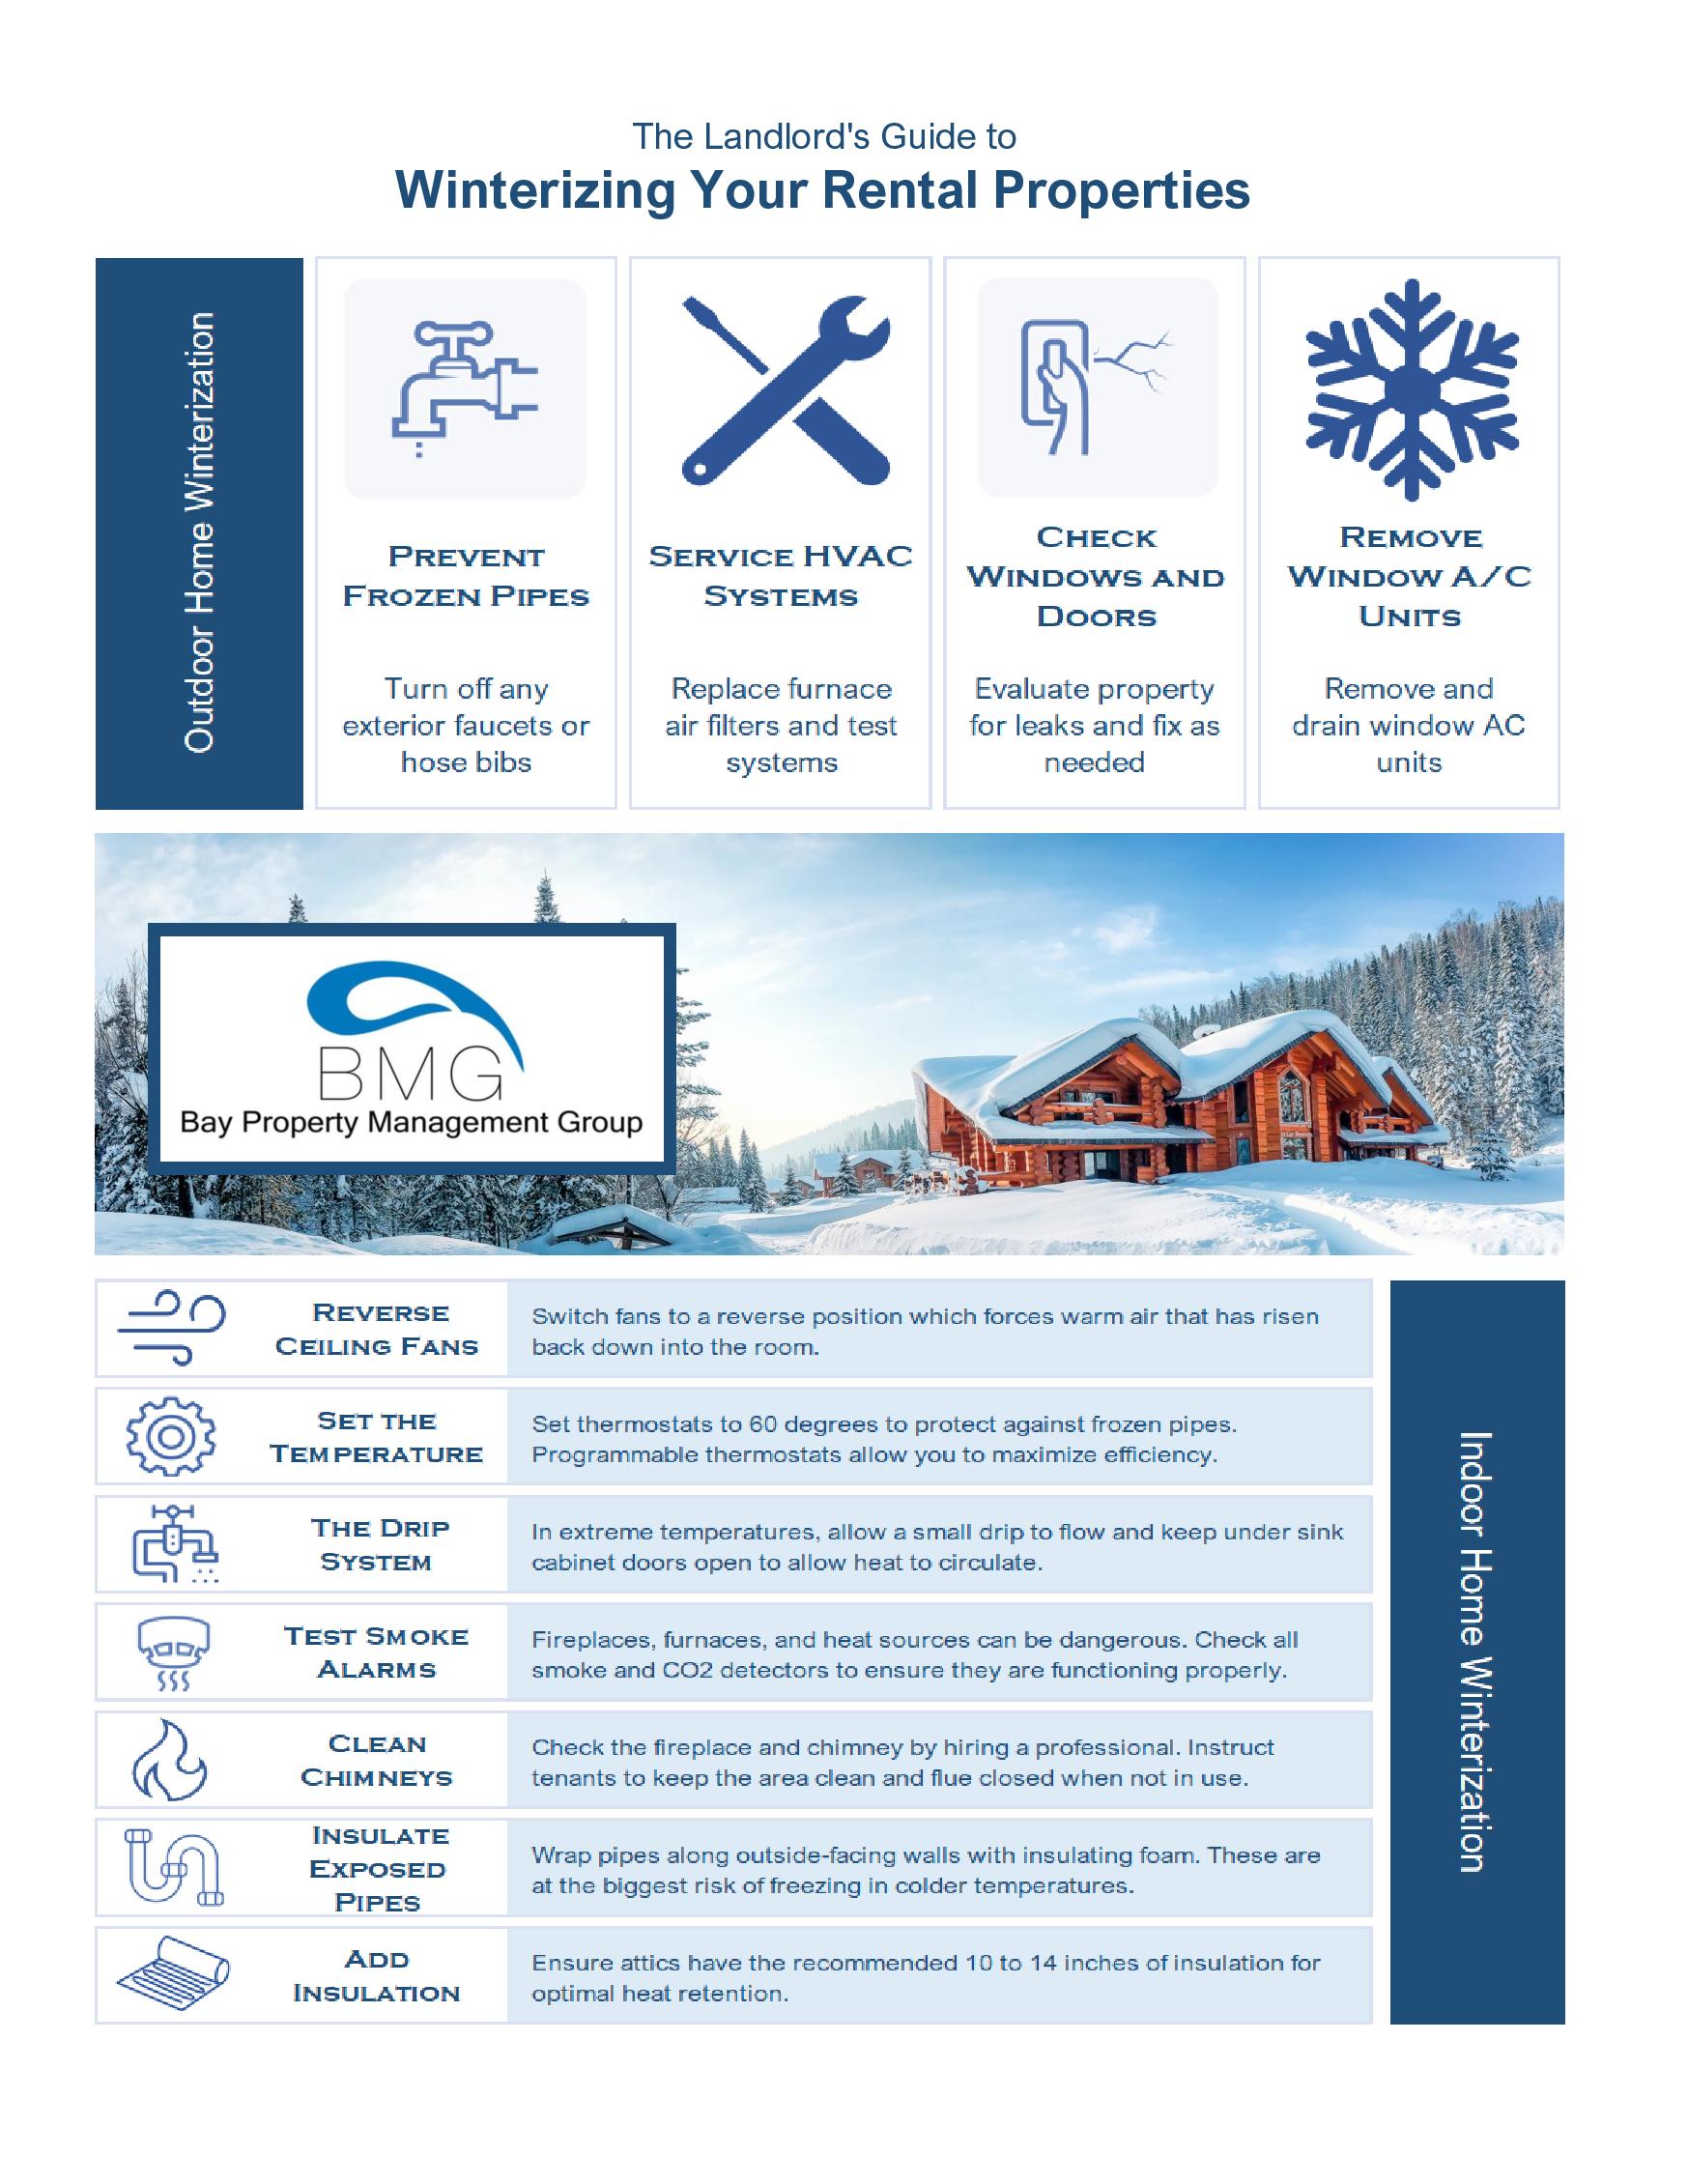
Outdoor Home Winterization
- Prevent Frozen Pipes – Turn off any exterior faucets or hose bibs. Remember that even frost-proof faucets can freeze and burst when a hose is left connected.
- HVAC Systems – Replace furnace air filters and test systems to ensure all components are working correctly.
- Check Windows and Doors – Evaluate entry points throughout the property for leaks and fix them as needed. Also, caulk works great for small cracks and gaps that let in the cold winter air. Weatherstripping can be used around doorways that do not seal as tight as they should. Additionally, filling in cracks and crevasses also keeps out bugs or rodents.
- Remove Window AC Units – Remove, drain, and store window AC units for next season. That said, if left in the window, the unit can collect snow, which puts a strain on the windowsill and can damage the unit.
Indoor Home Winterization
- Reverse Ceiling Fans – If possible, switch fans to a reverse position. This will force warm air that has risen back down into the room. Especially with vaulted or high ceilings, this can aid in lowering utility bills.
- Set the Temperature – Set the thermostat to a minimum of 60 degrees to protect against frozen pipes. Additionally, consider saving on energy bills by utilizing a programmable thermostat. This allows you to set different temperatures for various times of the day to maximize efficiency.
Pro Tip: For each degree you lower the thermostat, it can save up to 4% on your energy bill. Just don’t dip below 62 degrees, or you may risk freezing pipes!
- The Drip System – In extreme temperatures or when the home is vacant, allow a small drip to flow and keep under sink cabinet doors open to allow heat to circulate. Also, make sure drains are free of debris and clogs before leaving water to drip.
- Test Smoke Alarms – Fireplaces, furnaces, and heat sources can be dangerous. Check all smoke and CO2 detectors to ensure they are functioning properly.
- Clean Chimneys – Check the fireplace and chimney by hiring a professional. Instruct tenants to keep the area clean and flue closed when not in use.
- Insulate Exposed Pipes – Wrap pipes along outside-facing walls with insulating foam. These are at the most significant risk of freezing in colder temperatures.
- Add Insulation – Ensure attics have the recommended 10 to 14 inches of insulation for optimal heat retention.
How Do You Know if Your Pipes Are Frozen?
Take quick action if it is cold outside and you suspect frozen or compromised pipes. Thus, when this occurs, the top priority is to identify the problem areas and minimize damage. Keep an eye out for these tell-tale signs of frozen pipes.
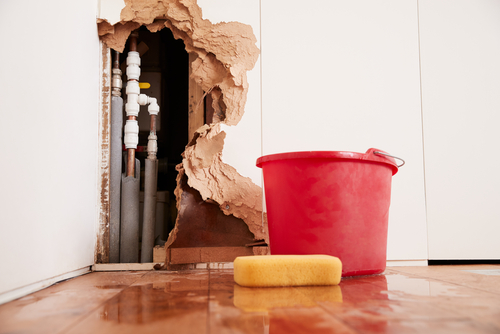
- If Water is Not Coming Out of the Faucet – A lack of running water may signal trouble! So, if the kitchen or bathroom faucets have little to no water flow, the pipes leading to them may have frozen.
- When There Is Frost on the Pipe – If the pipes are visible, look for signs of frost that may have accumulated along the exterior. This is an excellent warning sign that the pipes could have succumbed to the dropping temperatures.
- Odd Smells – This may sound strange; however, a different or strong smell coming from a drain or faucet may signal a blocked pipe. Look for additional warning signs to determine if the pipes may have frozen.
If these circumstances happen in a rental property, that only heightens the urgency. So, it is a good idea to address common signs to look for and tips for prevention with tenants as the winter season approaches. Therefore, thoroughly and clearly outline the steps tenants should take if frozen pipes are detected. When a tenant notifies a property manager or owner of suspected issues, there are two avenues to remedy the problem:
When to Attempt a DIY
If you have the experience, you might consider attempting to thaw frozen pipes on your own. This is only advised if the pipes have not already ruptured. Be sure to keep the faucet open during the thawing process, and understand that this can prove to be a difficult and dangerous issue to address on your own.
When to Call a Professional
Seeking the advice and expertise of a licensed plumber is the best choice. They have the equipment and know-how to mitigate damage, correctly address thawing pipes, and fix any leaks that may occur.
Will Insurance Cover Frozen or Burst Pipes?
Frozen or burst pipes, along with the leaks that result, can cause significant damage to a rental property. That said, owners will want to work with a licensed insurance agent to understand their coverage limits thoroughly. Additionally, the question of what is or is not covered depends on your chosen policy.
Generally, a homeowner’s policy should cover water damage from a burst pipe. However, each policy language may vary. Some could cover the cost of the repairs but not the damage to the surrounding property, while others may be just the opposite. However, all policies require occupants to take appropriate steps to mitigate damages as soon as a potential problem arises. Contact your agent to determine if the specific circumstances of your repair fall within the policy’s coverage limits.
Additionally, it is a good idea to require renters to carry their own insurance coverage. In the event of water damage, a renter’s insurance policy will cover a resident’s personal property losses.
Protect Your Rental with Professional Management
No one wants to deal with the consequences, costs, and inconvenience of failing to prepare and winterize a rental property. Now is the time to consider putting winterizing procedures at the top of your list. Do you need help managing preventative maintenance through the changing seasons? Bay Property Management Group can help! Our experienced property management team can communicate effectively with tenants, handle emergency maintenance concerns 24/7, and ensure your investment property is prepared no matter the season. For more information about our services, check us out online or call us today!